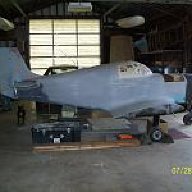
Teggles Posted June 9, 2024 Posted June 9, 2024 Hi Don, My Taylor Mono is a project started in 1978, so now it is part restoration and part build. Here is the fuselage with my new fuel tank. Yes the sides are on and no controls or anything fitted inside, which will be a challenge! There is some water staining but it is just a stain, no problem with the ply. I also have a rudder, which is OK, elevator - ok, tailplane which needs some work. Spars, 2 of which need some restoration, wing ribs which seem ok and a few odd bits and pieces. In the U.K. we are quite strict with materials and the design. Any changes needs to be submitted to our regulator for approval, so we don’t have the flexibility you have in the U.S. 1
Don J Posted June 25, 2024 Posted June 25, 2024 Teggles. No mention on wings and landing gear? When you open root spar holes, I would pilot drill from inside the fuselage outward because it makes for much less sanding and fitting. Cable routing will be a challenge due to ply already added on turtle deck but is doable. I guess you're getting ready to cut in inspection plate holes before covering with fabric ? What engine are you going to mount ? Post progress when you can I'd like to see how things are coming along. Don
Don J Posted June 26, 2024 Posted June 26, 2024 Just a short note on my build for future builders. After the ply is secured to the fuselage, I had inspection holes needed to be cut in for tail group access along with inspection openings for the fairleads about halfway from seat back to Virt. stab. Also don't forget access to rudder pedals if so desired. I did a couple test holes in scrap ply and got a good fit with covers. "BUT" I didn't think about the distance the fabric would take up once covered reaching all the way to the back side of the ply. A person probably wouldn't think it would matter but it does. Luckly, I caught it with my test piece and had to do some dermal sanding on 2 holes yet not covered. I wiped the relief from my brow thanking that I did not have to correct a mess. I used mainly recessed inspection plates with 2 domed inspection plates at 1/2-way point behind seat back because I was able to aid in securing with screw in the center to help from slippage. No inspection rings were needed as wing fabric will require. Off to work I go 🤪 1
Teggles Posted July 6, 2024 Posted July 6, 2024 Engine? That’s a good question. I was thinking of a VW 1600, my inspector says go for 1800. 200cc is going to make that much difference? Undercarriage will be a scratch build. I have got some springs, but nothing else. Spar brackets I hope to get laser cut. Cutting 32 brackets out of 4130 with a hacksaw does not appeal! I will get most of the fuselage/controls sorted out then look at the wings. I noticed Don you have a different fixing for the tailplane than on the plan’s. Can I ask why?
Don J Posted July 6, 2024 Posted July 6, 2024 I did not like the way the mounting for the Hoz. stab is per plans. Doing it the way did I can adjust AOA incidence if desired. A 1600cc or 1835 cc Vw will get you about 50-55 hp and to run that RPM prolonged can and does ruin the heads near the valves. You could ask around and see if someone has some WAF(wing attach fittings) from a KR-2 for sale. There was a time you could buy WAF's from NVaero. th (1).jfif
Teggles Posted July 7, 2024 Posted July 7, 2024 Do you have any drawings for your tailplane attachment fittings I could possibly look at? Being able to adjust the tailplane would be really good.
Don J Posted July 7, 2024 Posted July 7, 2024 (edited) Teggles go to page one of this thread, and you can see picture of mounts dated April 11th 2018 and a few further down. Edited July 7, 2024 by Don J 1
Teggles Posted July 7, 2024 Posted July 7, 2024 Thanks Don. I will chat to my inspector to see if we can get this as an approved modification in the UK.
Teggles Posted July 15, 2024 Posted July 15, 2024 A bit of an update. For some context my workshop is a large (dry) shed at the end of my garden. It’s large by shed standards but small for aircraft building. I normally put the fuselage out side and then I have plenty of room to work away. But, the weather in the UK has been awful this year, constant rain. We have a weather warning for heavy rain as I write; so progress has been slow due to cramped working conditions. Damage to a spar has been cut away and I will laminate a new piece on. Vacuum bagging seems the way to go and I have found a kit for only $100! Ouch, but it should work well. Metal parts are slowly being fabricated and I have this fantasy that soon I will have all the required parts and it will just need bolting together. Dreams I have dreams. 2 1
Don J Posted July 15, 2024 Posted July 15, 2024 Teggles I can relate to a small work area as you can see in my post. I was able to do all fuselage work in the basement but could not secure the root spars because of limited space to remove from basement. What metal parts are you in need of? I do have an extra set of wing attach fittings from a KR-2 and they are the same as a Taylor monoplane per prints. Let me know if I can assist in any way. Don
Teggles Posted July 15, 2024 Posted July 15, 2024 Thanks Don, I may do that. I hope to get the wing fittings laser cut, but 4130 needs a powerful laser to cut them. How are you getting on with the undercarriage? 1
Don J Posted July 15, 2024 Posted July 15, 2024 As always things are going slow, I look forward to winter because gives me more time to focus on the build. Undercarriage is a matter of money and finding the right deal on Grove type main gear because much lighter than stock I do have tires, wheels and brakes. I don't want to expose my fuselage to outside weather until body is completely covered in fabric and Poly spray has been done even sunlight can cause problems with the plywood and paint. I did manage too temporarily insert root spars to get the root fairings built and that was a technical mission of its own. I'm working on fuel primer location and a few other cockpit goodies needing mounting. A plasma cutter and good drill press will do a good job on fittings but there is always filing and sanding needed also. Don JOIP (1).jfif
Teggles Posted July 20, 2024 Posted July 20, 2024 As this is a partially completed project, I have undo some of what has been damaged or built wrong. Today is the rudder post, cracked with 2 big wood screws holding it together! Just 4 mortice joints, no problem except they are coming together at several different angles, nothing square 😩 but it is done, not glued yet and it’s vertical! 1
facthunter Posted July 21, 2024 Posted July 21, 2024 Has anyone ever put a bigger rudder on a Taylor Mono? Nev
Teggles Posted July 21, 2024 Posted July 21, 2024 I have seen smaller, not bigger. Do you think the mono does not have enough rudder?
facthunter Posted July 22, 2024 Posted July 22, 2024 It certainly doesn't have too much . I've seen one flying example and I wouldn't say it's for unskilled drivers. . IF speed is your aim leave it as it is. Now's the time to consider it, not after you've finished it. Nev
Teggles Posted July 31, 2024 Posted July 31, 2024 Nice working in the sunshine, becoming a rarity here in the UK! 4
Don J Posted July 31, 2024 Posted July 31, 2024 (edited) Tegg. Sun does help💡 and I hope you have your hinges worked out. It took some time to get mine aligned. It helped having a 5 ft. long 3/16" metal dowl. I guess you are going per plans on hinges. I found it helps a lot to build a rotisserie to hold each end of the fuselage where you can rotate it 360 degrees especially during covering with fabric. Looking good friend keep at it. Don Edited July 31, 2024 by Don J 2
Teggles Posted July 31, 2024 Posted July 31, 2024 Hi Don, I was going to use a laser for getting the hinges aligned. Just started cutting out the metal for the hinges. It’s the small jobs that take the time 😄
Don J Posted July 31, 2024 Posted July 31, 2024 Good luck on the laser method. I found the best result was to use feel of hand after I got the hinges as close as laser would allow, and it seems every time I had to remove the pins to work on the controls after reinstalled things always needed readjusted in hinge alignment. In other words, Tegg the hinges are a pain in the ass to say it politely.🫢 Do you have your vertical Stabilizer built yet? The reason I ask is the VS can be built to help in roll over protection as I did mine. Don
Teggles Posted July 31, 2024 Posted July 31, 2024 The vertical stab, which was with the project when I bought it is for the trash. Badly built and is a very poor git. Interesting you mention roll over protection. A couple of weeks ago I was at the UK’s Air Accident Investigation Branch (equivalent to your NTSB) and the question of roll over protection came up in a discussion about a couple of accidents. How did you incorporate protection into the fin?
Rhys1701 Posted July 31, 2024 Posted July 31, 2024 On 21/07/2024 at 2:17 AM, facthunter said: Has anyone ever put a bigger rudder on a Taylor Mono? Nev Absolutely! My (new to me) 1988 build has square wingtips, elevator and tail. Superb unique look - questionable improvement in handling YMMV.
Don J Posted July 31, 2024 Posted July 31, 2024 (edited) 2 hours ago, Teggles said: The vertical stab, which was with the project when I bought it is for the trash. Badly built and is a very poor git. Interesting you mention roll over protection. A couple of weeks ago I was at the UK’s Air Accident Investigation Branch (equivalent to your NTSB) and the question of roll over protection came up in a discussion about a couple of accidents. How did you incorporate protection into the fin? As you can see in the photo, I took high density foam and stacked glued it into the inside of fin with the hopes it will help keep the cockpit accessible if plane is on its back. I believe a roll bar just behind the head mounted in the hard point of seat belt will be incorporated in my build also. With these two added safety features in a nose over in dirt or mud your chances are 2-x better to get out of the plane. Plus, no need for ply covering the fin if made solid with foam and med fabric. Edited July 31, 2024 by Don J 1
Red Posted August 1, 2024 Posted August 1, 2024 10 hours ago, Rhys1701 said: Absolutely! My (new to me) 1988 build has square wingtips, elevator and tail. Superb unique look - questionable improvement in handling YMMV. I keep meaning to get to Sackville then something else comes up (Broken foot at the moment hence all the posts in here), will you keep her there?
Teggles Posted August 1, 2024 Posted August 1, 2024 I will probably keep her at Felthorpe, near Norwich. Lovely grass strip, but just inside Class D airspace 😫, but ATC are very helpful.
Recommended Posts
Create an account or sign in to comment
You need to be a member in order to leave a comment
Create an account
Sign up for a new account in our community. It's easy!
Register a new accountSign in
Already have an account? Sign in here.
Sign In Now