
IBob
-
Posts
3,012 -
Joined
-
Last visited
-
Days Won
26
Content Type
Profiles
Forums
Gallery
Downloads
Blogs
Events
Store
Aircraft
Resources
Tutorials
Articles
Classifieds
Movies
Books
Community Map
Quizzes
Videos Directory
Everything posted by IBob
-
 How was the Helo altitude derived? And does/did that value require correction for QNH?
 -
You mean the gentleman's aerial carriage, Nev?........)
-
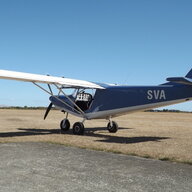
This is how ICP present it for the Savannah, facthunter: a graph with 2 lines showing the forward and rear limits. Using the 'arms' provided and the weights (for fuel, people and baggage) you combine the results with the original aircraft w & b figures, then plot the result on the graph to see where you are on the allowable range for that all-up weight. That part is very straightforward (and it's also near impossible to load outside the limits unless you were to grossly overload the baggage, which has a limit of 20Kg.)
-
Thanks all for your input.....I'm learning! I see now that there is no fixed centre of lift, and that a forward datum avoids possible errors with negative values. What brought this up is the question of weight in the baggage area (immediately behind me) vs weight in a tail locker. In a steady flight situation, a much smaller weight in the tail locker will have a similar balance effect as a larger weight in the baggage area. But how much smaller? Measuring from the LE as the POH does, the tail locker 'arm' would be approx 3.35M. As previously stated, the baggage area 'arm' is 1.32M. This suggests that 10Kg in the baggage area has the same w & b effect as almost 4Kg in the tail locker. That just doesn't feel right, somehow.............(
-
My Savannah (no sweep on the wings) came with a set of standard 'arms' in metres for use when calculating W & B for a given load. Eg for baggage area: Kg baggage X 1.32M, 1.32 being the given 'arm' for baggage. These arms all appear to be measured from the leading edge of the wing. I would have thought they should be measured from the centre of lift. As any weight forward of that would push the nose down and vice versa. I'm interested as I've been thinking about the difference of weight in baggage vs weight in tail, and with the given arm for baggage, the (theoretical) difference does not seem as great as I would have expected. Can anyone explain this (why the leading edge?) to me.....or point me to a thread that will do that?
-
My tank seepage was a bit scary: No signs of it during initial ground runs or test flights. But shortly after someone said I had a damp patch under, and when I popped the belly hatch the entire outer walls of the tank were damp and shiny: fuel making it's way down the outside. And quite probably an explosive fuel/air mixture in the confined space of the rear fuselage.............(
-
Moneybox, as I recall the fittings in my tank are as you describe: threaded brass 'nuts', moulded in.
-
As I recall, the two main ports were threaded females that looked to be moulded into the tank, and the fittings that went into them had some sort of 'rubber' ring to make the seal. I wonder how that third port was fitted to make it fuel-tight? My tank developed seepage from from one of those tops ports, which wasn't evident initially. I had to pull the tank and trim some of the plastic round the fitting to get it to seal properly. May be worth keeping an eye on initially, Marty.
-
I was wondering that too: the standard ICP unit comes with just 2 ports (plus the level switch) in the top, so far as I know. The VG model I have seen was built with each of those ports connected to one of the two wing tanks. To give venting they then brought both/all tanks into one port, and used the other for the vent line.
-
Marty, at cruise, if I valve off all fuel to the receiver, the low fuel indicator comes on after 2.5minutes. That's about 0.7L. Which is to say it takes a fair sized bubble to give false alarms. But I have seen it in an unvented VG.
-
Ops....certainly not got him! Got the message....and added the method he outlined to my quite narrow fund of knowledge. Thanks, Blue.
-
Gotcha............)
-
Blue, if the blade height is 1100mm, then 1 deg of pitch is about 20mm of laser spot movement. Actually a bit more, but not hugely so: 1100 x 2 x 3.14 = 6908 Divide by 360 = 19.2
-
After that, I think smooth running comes down to carb synchronisation. That starts with the standard Rotax adjustment of the idle throttle stops and idle jets, which is a quick and simple job. I took particular care installing my throttle linkages and routing the cables, then adjusted the cables so that both carbs come off the full throttle stop at the same time when when throttling back. Since much of flying is done at higher engine speeds, this seemed to me to be the most important end of the range. I do check at the other end of the range...that both carbs come off the idle throttle stops simultaneously, and in my case they do that too. I made minor adjustments to maintain the synchronisation over the first 50hrs. Since then I have checked periodically but no further adjustment has been necessary. I also fitted a simple idle position stop to the throttle bar that runs across the firewall: without this, if the pilot pulls back hard on the throttle, the load goes onto the carb throttle arms, and once they hit the carb idle stops, the arms will flex or distort.
-
Marty, for the stick with clamp, I just hold it vertical to start with and put a masking tape marker on the floor where it lands. I then position the stick on that marker for each blade. I also use masking tape on the floor where the laser hits, so I can make precise marks with a pen. As for tracking, I can't remember clearly how I did it. I think I had the aircraft facing a wall, brought each blade round onto the stick then measured to the wall. Or something like that. I certainly didn't go to the bother of removing the prop. I'm not sure if you have measured and marked in from the tips for the laser location on the blade. If not, I would definitely recommend that too. I guess it all sounds like a lot of mucking around, but I have found it simple and not a long job once you have the tools and method sorted. An additional check as to how well you've done can be made in flight: at certain sun angles, the sun flashes off the back of the blade and all the flashes will look the same if the pitching is accurate.
-
Marty......much tidier than the thing I cobbled up! Apart from very accurate measurements from floor to blade (I use a stick with a clamp on it, bring the each blade down onto the clamp) and very accurate measurement from blade tip to laser position (I use a sliding square and mark the location with masking tape).........there is one other thing to watch for using this method, and that is blade tracking: One of my blades tracks about 2mm further forward at the tip than the other two, so I factor that in. If I were using a similar method, but with an inclinometer on the blade, I wouldn't have to be concerned with the tracking. The only proviso then would to be sure I was using a good quality inclinometer, as they are not all born equal........ For myself, I will carry on with what I've got: done with care it does get very accurate results. PS I tighten all bolts fully then check all blades again, as sometimes the tightening does shift the pitch a bit.
-
Strobe, landing and wig wags questions
IBob replied to Lyndon's topic in Aircraft General Discussion
Skippy, I have to disagree with 'completely ineffective'. For instance, you don't think landing light/s make an approaching aircraft more obvious when you are waiting to enter a runway??? What I would agree with is that typical/traditional wingtip and beacon lights are very poor in bright sunlight. Having said that, I have seen, a beacon so bright in daylight that I walked the 700M across the airfield to see what it was. That was on the ground. I'm pretty sure it was one of the Aveo products. And you may have noticed that cautionary lights on road maintenance and emergency vehicles are now a whole lot more visible at distance than they used to be? The technology is getting better and brighter, and that will percolate through to aviation kit. -
Strobe, landing and wig wags questions
IBob replied to Lyndon's topic in Aircraft General Discussion
Hi Lyndon, I can't answer as to what is mandatory......but I'm sure others here will know. What I would say is that, now we are better understanding the limitations of the eye in 'see and be seen', they are definitely not something I would skimp on. -
 Red, it would be interesting to know what proportion of those went on to cover the costs of development in production and sales.
 -
I guess they probably do that fine at the factory......where they've had the practise, have worked out their methods, and will have jigs and tools to expedite everything. So they'll be on the tools and building all the time. Whereas, on a first build, there is probably a great deal of time spent figuring things out, getting things right, and generally proceeding cautiously. I have struck the same thing with house renovations/modifications: a builder mate of mine would drop by and do more in 3 hours than I got done in a day. It puzzled me a bit, so I began watching myself......and realised just how much time I was spending trying to think things out etc, while he knew just what he was doing and his 3hrs was on the tools full time.
-
sfG I can't speak for the Ventura, but for the Savannah I've come across two numbers: 400hrs and 700hrs. It would be really interesting to know where they came from, as an ex-airforce sheetmetal worker here took about 1700hrs on his. And while I did not log the hours, mine would easily have taken that long too.
-
New member intro with an interest in all matters of aviation
IBob replied to joehupp2004's topic in Just Landed - Welcome
Welcome, Joe. This is a very big site, with a huge historical wealth of information and discussion. And opinions.......we're rarely short of those.........) -
AN-2 crash Kamchatka due icing 20 dec 2024
IBob replied to pmccarthy's topic in Aircraft Incidents and Accidents
Pretty tough winters up there: I spent part of one on Paramushir, just off the end of the peninsula. The houses of the one village....about 2000 people......disappeared entirely under the depth of packed snow, with only raised escape doors sticking up above the surface enabling the inhabitants to come and go. And the weight of that same snow, which just builds up and progressively compresses to ice, completely bowed in the roof of one of our containers........ -
While I can't claim to know about fuel systems on other types, it seems to me the 701/Savannah setup is well thought out and functions very nicely: The 6L receiver tank with level switch buffers any momentary unporting of the wing tanks, while giving 15minutes of early warning of fuel exhaustion. And the fuel return (via orifice) addresses the problem of vapour lock.
-
Marty, that seems very comprehensive. Just some notes: 1. My receiver tank developed a leak from one of the upper fittings: the tank came with fittings in place and I had omitted to check they were tight. The leak did not occur initially and required removal of some plastic round the fitting to remedy. Almost certainly a one-off, but I suggest checking for any dampness on or round the tank during initial trials. 2. The electrical aux fuel pump should give you at least 2PSI once the carbs are full. I did my initial engine runs without wings, with the fuel return line blanked off. Since the pump has a non-return valve, the system maintained the 2+PSI with the engine off when the pump was run then turned off. With wings on and the return line connected, engine off, the aux pump should still give you 2+PSI but this will drop to 0PSI once the pump is turned off: this indicates that your return orifice and pipe are clear and functioning correctly. I did not top my tanks off, just used enough fuel to to flood the receiver tank etc and test for adequate flow. The aux pump delivered 1.2L/min. Assuming you have the Savannah receiver tank (?), the early Savs had no tank vent there. The result was that small amounts of air could become trapped in the upper tank and would give false 'tank low' indications. Typically this would occur when climbing to altitude, as the trapped bubble expanded. Later Savs fixed this by running a vent line from the tank top to the upper LH wing tank.


