Kyle Communications
-
Posts
6,652 -
Joined
-
Last visited
-
Days Won
97
Content Type
Profiles
Forums
Gallery
Downloads
Blogs
Events
Store
Aircraft
Resources
Tutorials
Articles
Classifieds
Movies
Books
Community Map
Quizzes
Videos Directory
Everything posted by Kyle Communications
-
He isnt sure about the big bore version..he offered me a kit but I would probably have to do other stuff to it...getting the compression right too is another thing so would need sparer rings for the heads to lower compression Our conversation is below. But I have had good feedback from Gyro guys about his conversions. I have supplied my replacement CDI's to the gyro guys I gather you want to put it in a Hornet. I had a guy drop into my farm with a Hornet with a std 912ULS..the perfomance wasnt that great..it does need about 20 more horses and it would be a great aircraft Hi Mark, This would be a one off. I have only done testing on the standard 100 hp with the turbo. Also other considerations like the bore diameter and the current compression ratio would have to calculated. Other companies won't turbo the big bore so I couldn't guarantee how well the engine would hold up. Can you give me some more info on the engine like cylinder bore diameter compression ratio and if the camshaft is standard? Thanks Steve Hi Steve The bore is 4mm bigger and is 1484 cc once fitted. I believe the compression ratio is the same. The camshaft is std. Its basically just replacing the pots and pistons which are 4mm bigger in size. I had the crank welded and the engine has been totally balanced. I understand the differences in piston load etc although the piston speed is the same as there is no difference in the stroke of course. Hi Mark. I could offer you a turbo conversation kit If you have a mechanic to do the conversion. there may be differences in some parts you would have to work out as you go.
-
I asked him about doing a turbo for a big bore kitted 912 ULS which is a base power of 114hp turbo would bring it up another 15 or 20hp. He hasnt done one like that. Mark
-
Sometimes you need to put a washer infront of the piston. when the pads get low the piston will pop out
-
There is a guy in Melbourne who does a lot of 912ULS turbo conversions. Mainly for the gyro guys. Everything I have seen he has all good reports Mark
-
yes Mike it goes back quite a long way..but RAA have never said anything against it..they just seem to refuse to take up the topic or support AOPA in any way on it....they just keep their mouth shut...for obvious reasons
-
KG. I think what it is ...that RAAUS has not supported AOPA in their push for it. They basically have stayed quiet everytime AOPA has asked them
-

Palmyra YPYA airfield celebrated 20 years
Kyle Communications replied to Blueadventures's topic in AUS/NZ General Discussion
My boss was up there a few weeks ago with a drag weekend -
My Savannah S model rebuild Blog
Kyle Communications replied to Kyle Communications's topic in Savannah
I just want to get her finished and flying 🙂 -
Raeburn..very glad you both are ok
-
My Savannah S model rebuild Blog
Kyle Communications replied to Kyle Communications's topic in Savannah
Thanks Bob..I hadnt actually looked into that and it makes sense..also will be much easier to install then..the pilot side allows much easier access -
My Savannah S model rebuild Blog
Kyle Communications replied to Kyle Communications's topic in Savannah
The top is the inlet side thats the pipe than cones down the back of the engine..the hotest water is coming from the pump but that is a little problematic I think to get the connection there although of course its the best place. Dunno will have a better look and think about it this weekend but it makes sense to do so. My RANS S-21 engine is a 2015 that we rebuilt and balanced I didnt think to look now I know its not the same since 2013. The engine is on a engine stand so will spin it over and have a look -
My Savannah S model rebuild Blog
Kyle Communications replied to Kyle Communications's topic in Savannah
I was thinking of just adding a small piece of normal metal pipe inline on the return side and screwing in a LM135 or similar probe in there. I made the temp sensors in the girlfriend Just heated up the old resistor ones and pulled the guts out then wired up a LM135 and epoxied it in there..worked a treat for all my other sensors so that maybe a solution. I think I will monitor the rear one in the head as that is the hotest and the water in the pipe for the second one -
My Savannah S model rebuild Blog
Kyle Communications replied to Kyle Communications's topic in Savannah
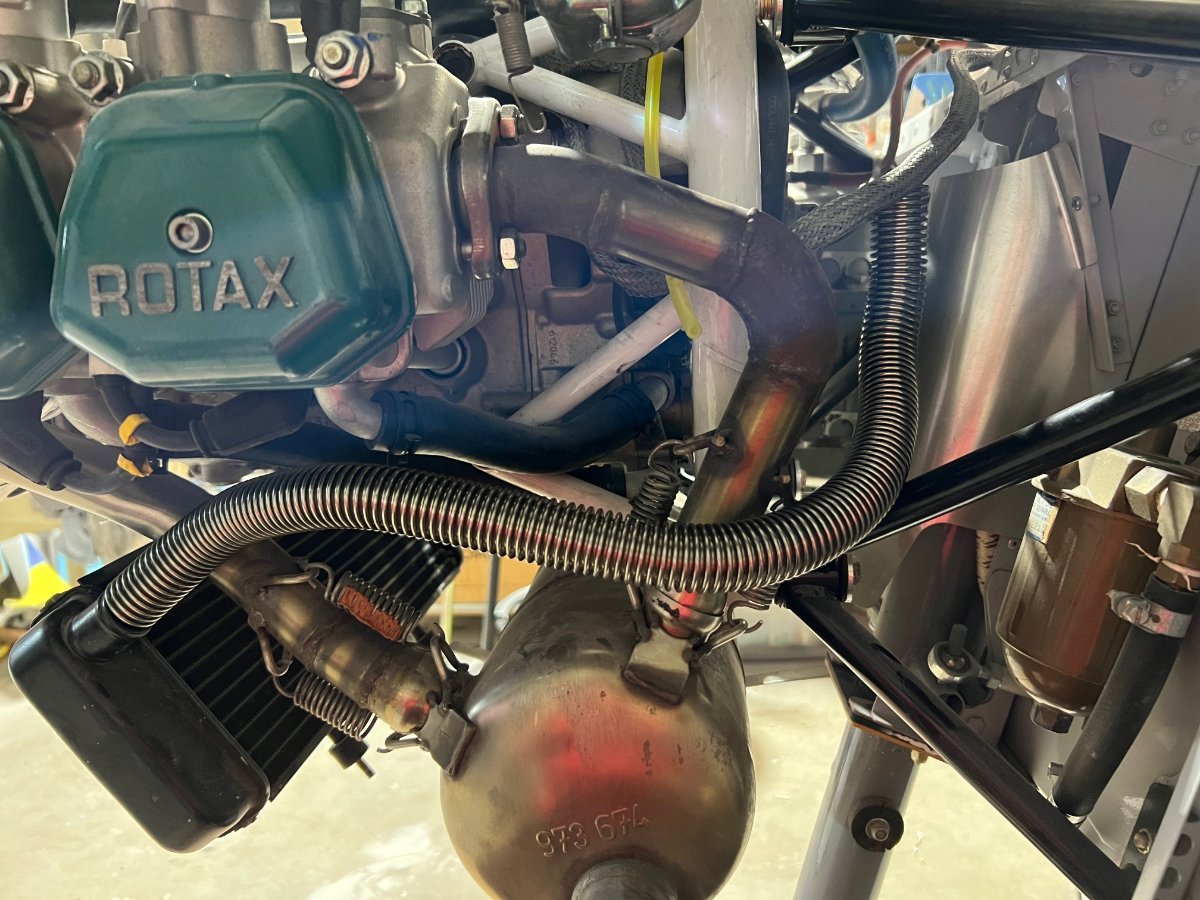
Yes I am aware of the slight reduction of ID on the pipe. I have now though probably almost twice the cooling area of the radiator due to the new opening. Having a big bore kit fitted I am expecting more heat. The engine is the pre 2013 so the temp senders measure the head temps not the water temp. I am thinking about fitting some sort of water temperature sensor as well. The metal pipe will also help dissapate some heat as there is a lot of surface area of the pipe when you consider the corrogations on the pipe. Danny was over yesterday and we were talking about how we are going to mod the exhaust pipes. Hopefully next weekend I can get that done and if I get my backside into gear this week I will have the avionics ready to start the engine and have all the monitoring going. There isnt a huge length of the steel pipe on the pax side its only about 300 long and the pilot side is about 450 long. Now the radiator core is fully exposed and also the angle in the airstream is much flatter...it still is angled though so its a suck it and see thing I suppose. I am not expecting anything too dramatic -
New throttle system for Rotax
Kyle Communications replied to Kyle Communications's topic in Savannah
Hi Kevin. Yes I will let people know when they are available ..I made an initial 9 production samples and they went in a day basically once I said I had them. This was to finalize the laser cutting specs to make sure they were close enough. I have ordered enough to do 50 kits just to see how they go. Hopefully will have them in two weeks..CNC places are like everyone here...way behind 😞 . I know its been a really long time in coming but just too many things to do here and life gets in the way a lot lately. Also had to make some mods but I am pretty happy now with how it is Mark -
My Savannah S model rebuild Blog
Kyle Communications replied to Kyle Communications's topic in Savannah
Still need to put a clamp on the radiator end...I am waiting for more of the 12mm wide clamps
-
My Savannah S model rebuild Blog
Kyle Communications replied to Kyle Communications's topic in Savannah
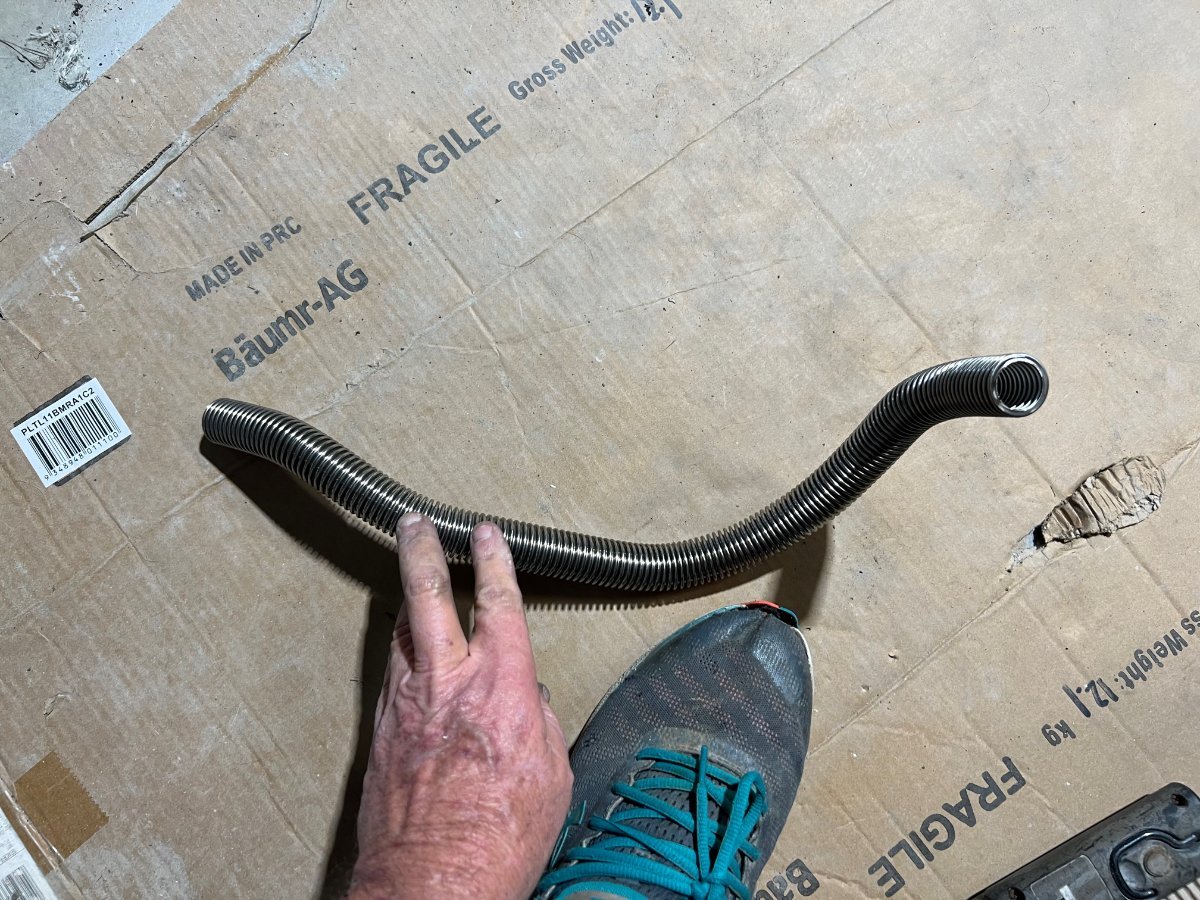
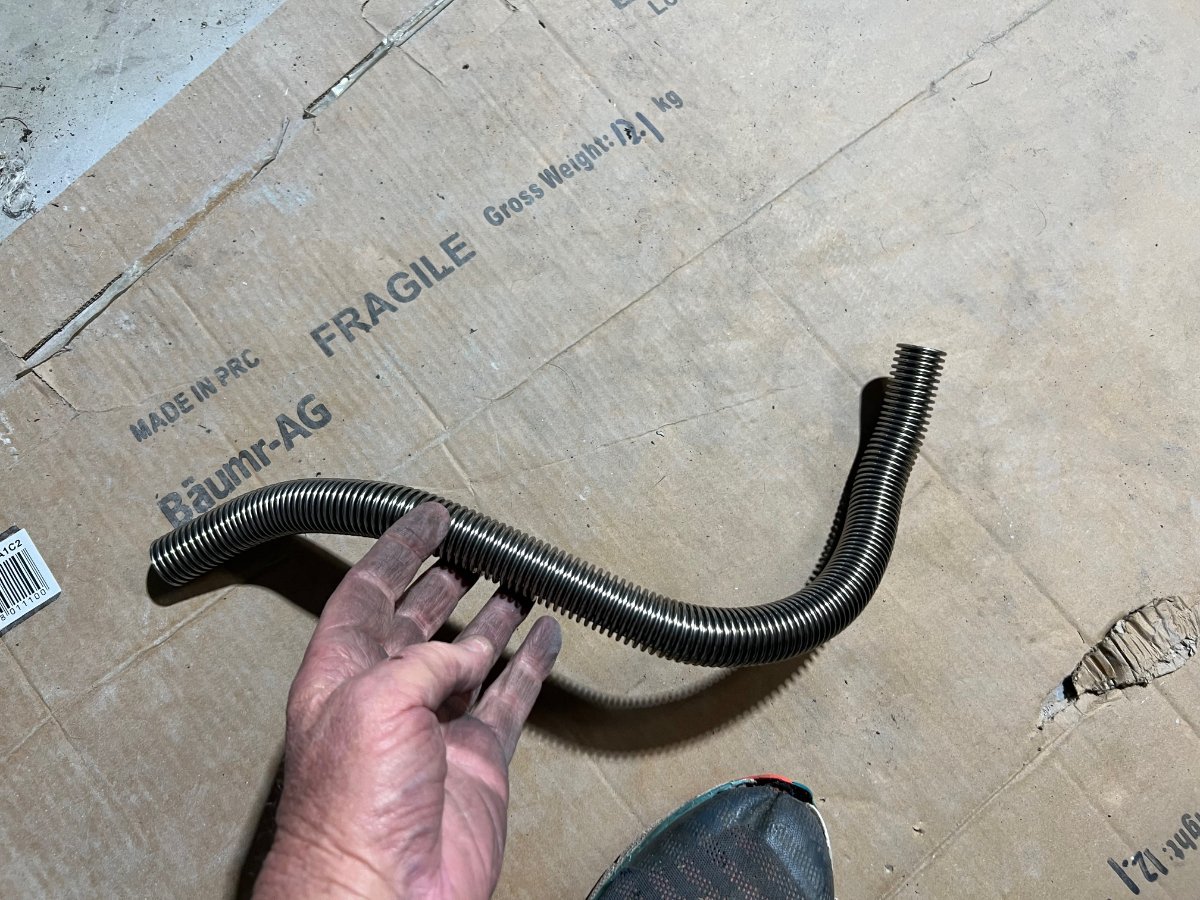
Another thing about the hose...I used the 25 to 40mm clamps to grip the rubber/silicone hose to the tube..but make sure you get the 12mm wide clamps not the 9mm wide clamps..and the SS tube doesnt crush at all the clamps tighten down nicely and will make a perfect solid seal -
My Savannah S model rebuild Blog
Kyle Communications replied to Kyle Communications's topic in Savannah
I used the std Sav radiator bracket which is just 2 smallish bent brackets but because my radiator is more facing forward I have 2 straps coming back to the bottom noseleg plate to achor the bottom of the radiator...I will take a pic later -
My Savannah S model rebuild Blog
Kyle Communications replied to Kyle Communications's topic in Savannah
Hi Marty Pacific HoseFlex..... they are in the Gold Coast and Victoria and Perth..I believe they actually manufacture it. You want the annular hose and no outside sleeve Download the chart and just be away the size is the ID. so the OD is much larger. The water pipe I used is the 20mm and the SS0-A. tube https://hoseflex.com/product/metallic-hose-annular/ -
My Savannah S model rebuild Blog
Kyle Communications replied to Kyle Communications's topic in Savannah
I thought that ICP only supplies fuel and oil pipe from what I had seen. I didnt realise that they did the water as well. As I said before I wasnt keen on how thin the pipes I saw were. I am much happier with this locally sourced stuff though. To the point where I think I may use it all the time...it is a little heavier of course but I feel more comfortable using it -
Question re MTOW increase
Kyle Communications replied to red750's topic in AUS/NZ General Discussion
https://www.raa.asn.au/calendar-of-events/latest-news/article/?id=mtow-application-submitted -
Is RAA getting 760kg MTOW?
Kyle Communications replied to Sloper's topic in Aircraft General Discussion
https://www.raa.asn.au/calendar-of-events/latest-news/article/?id=mtow-application-submitted -
My Savannah S model rebuild Blog
Kyle Communications replied to Kyle Communications's topic in Savannah
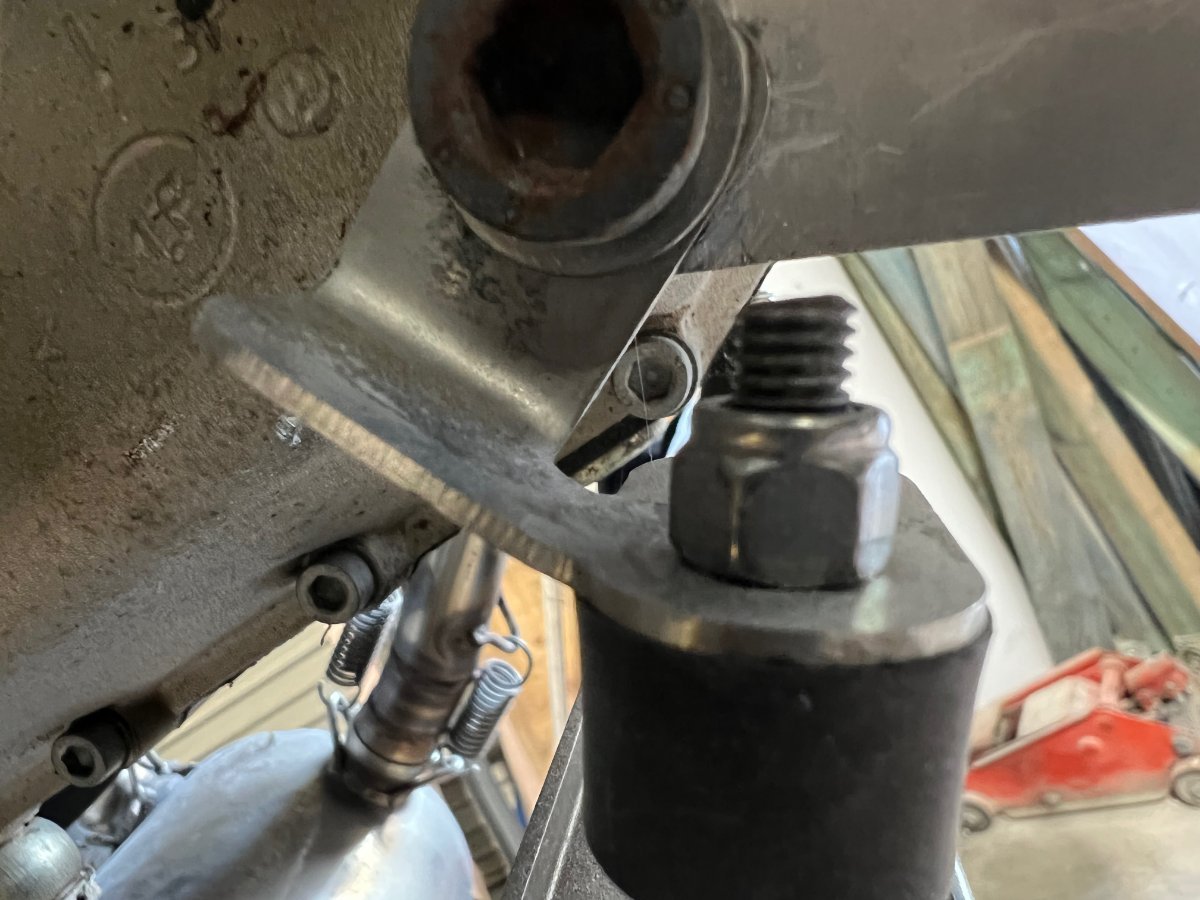
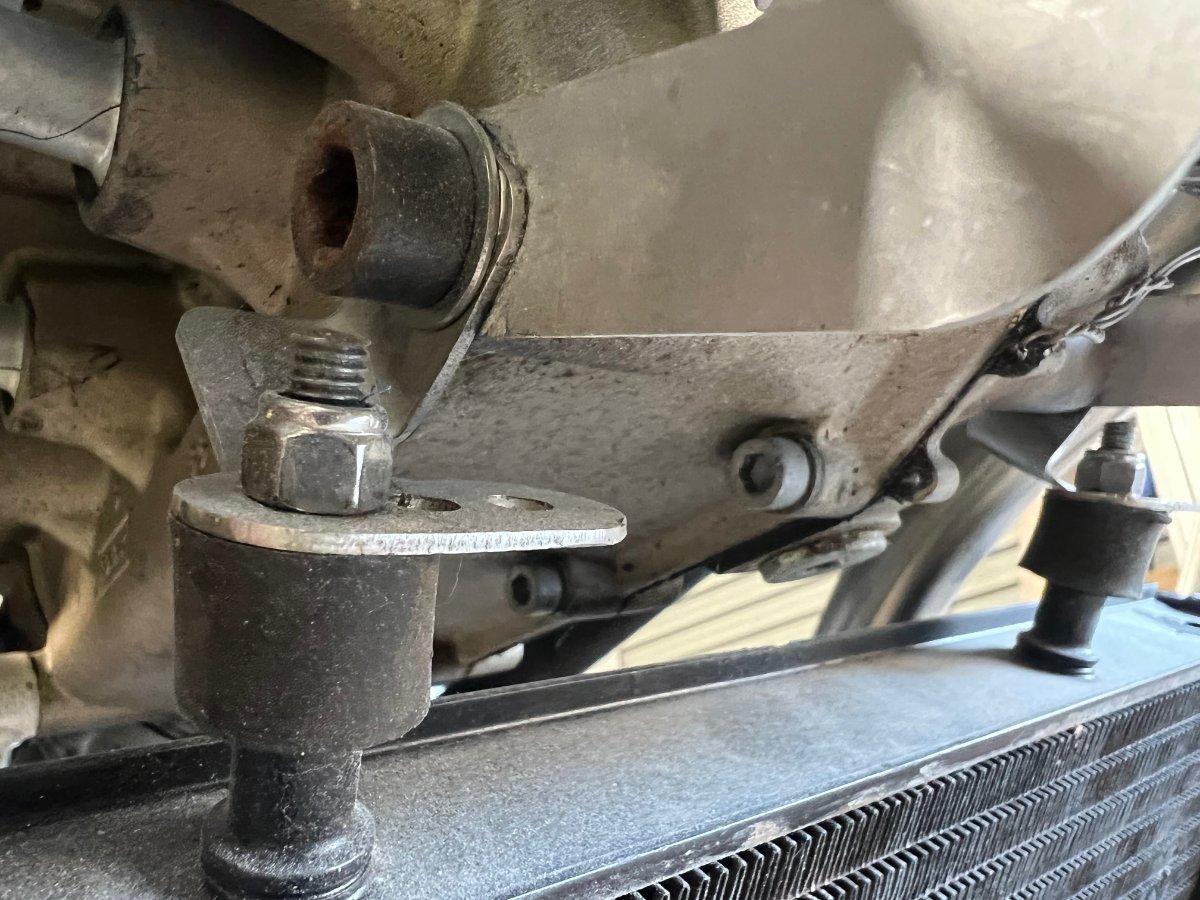
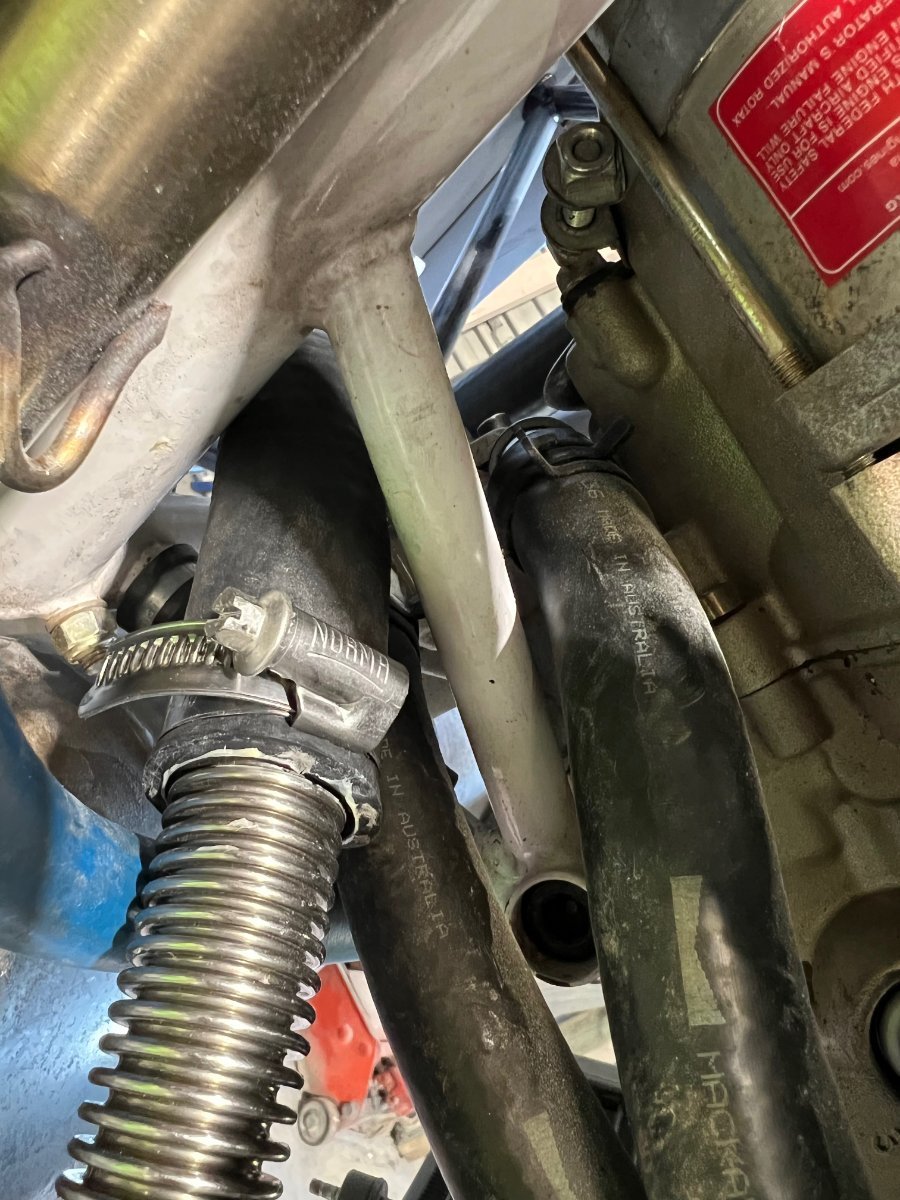
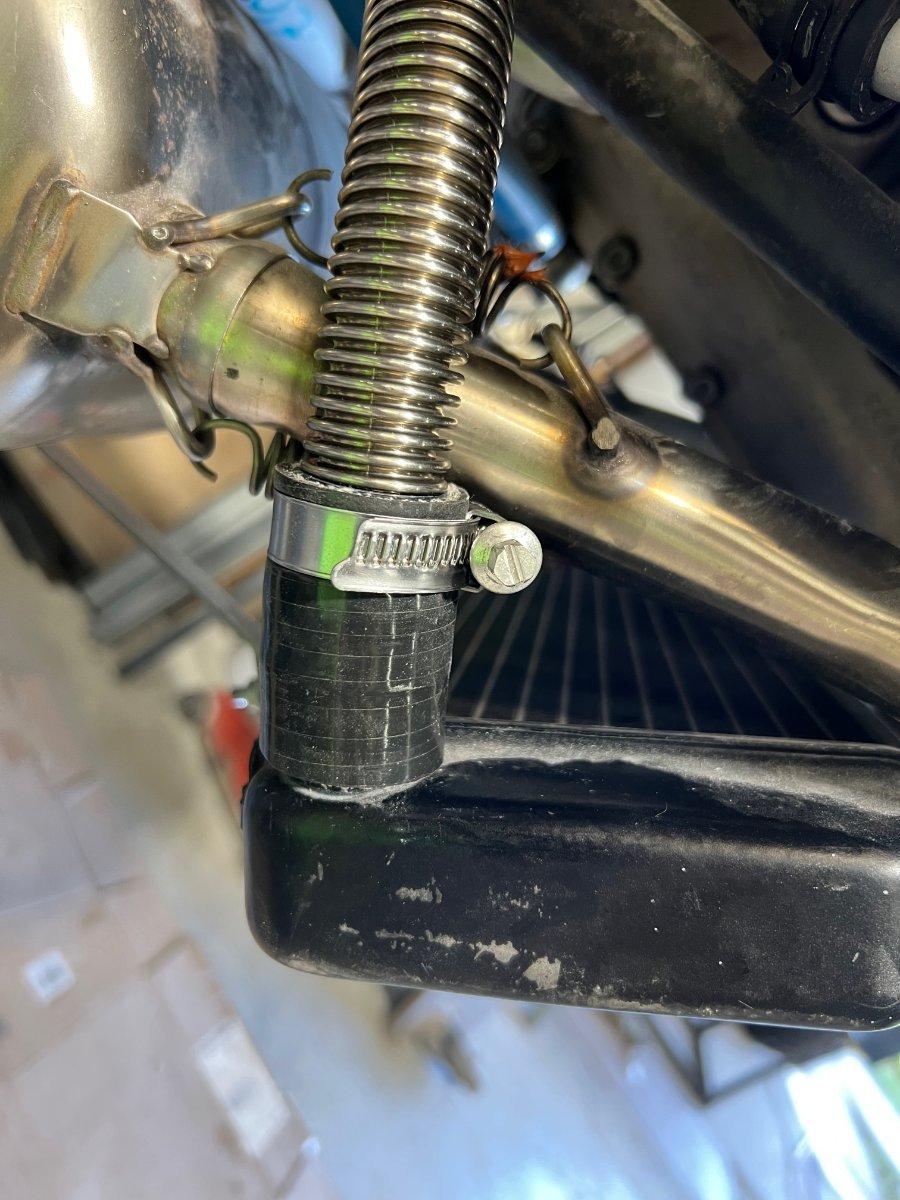
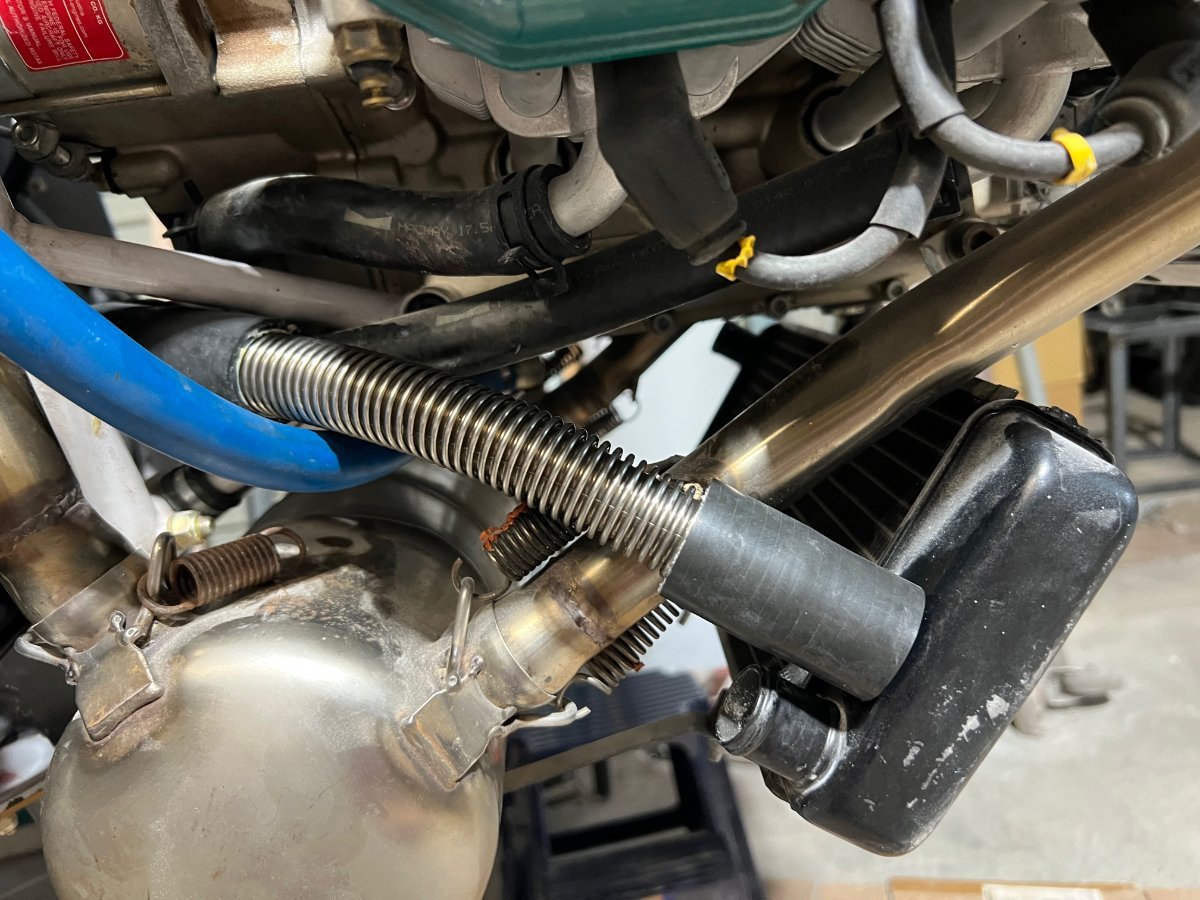
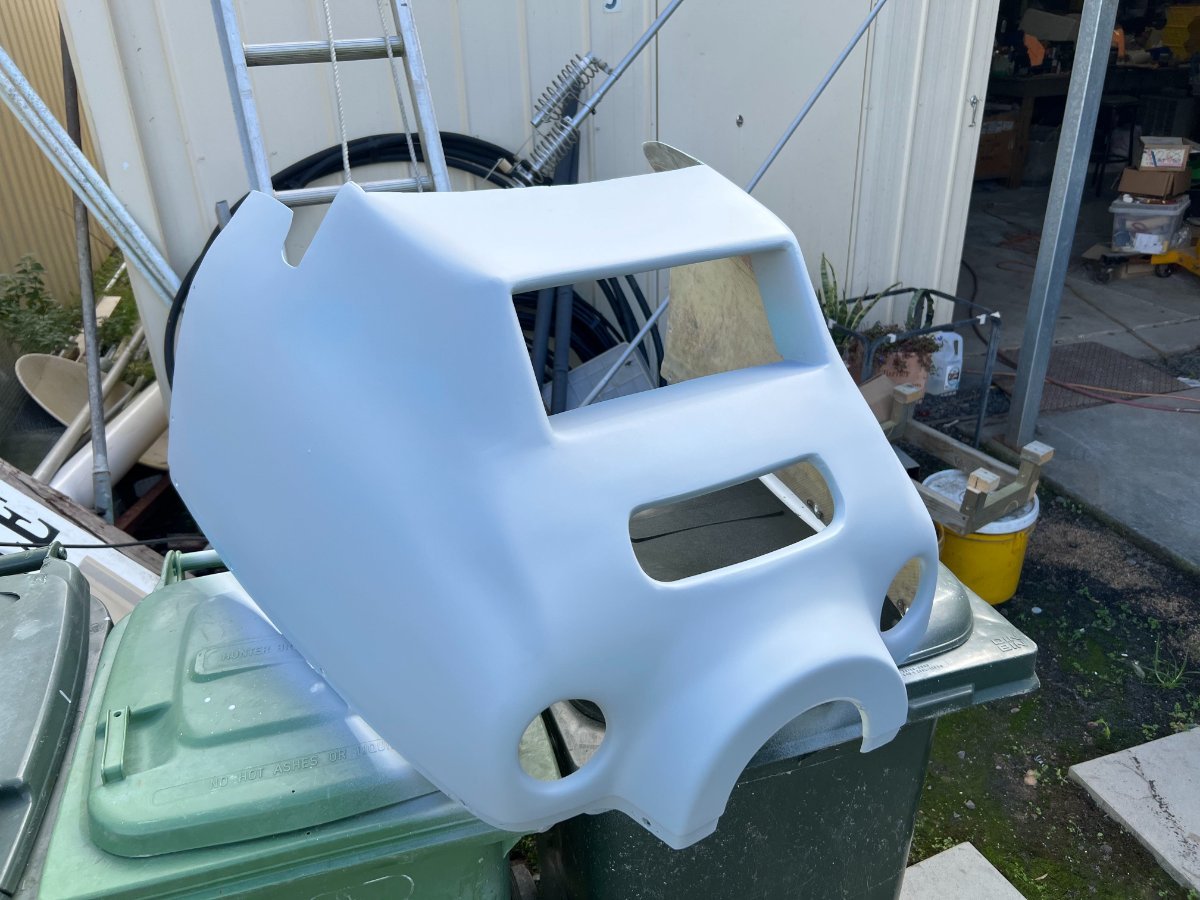
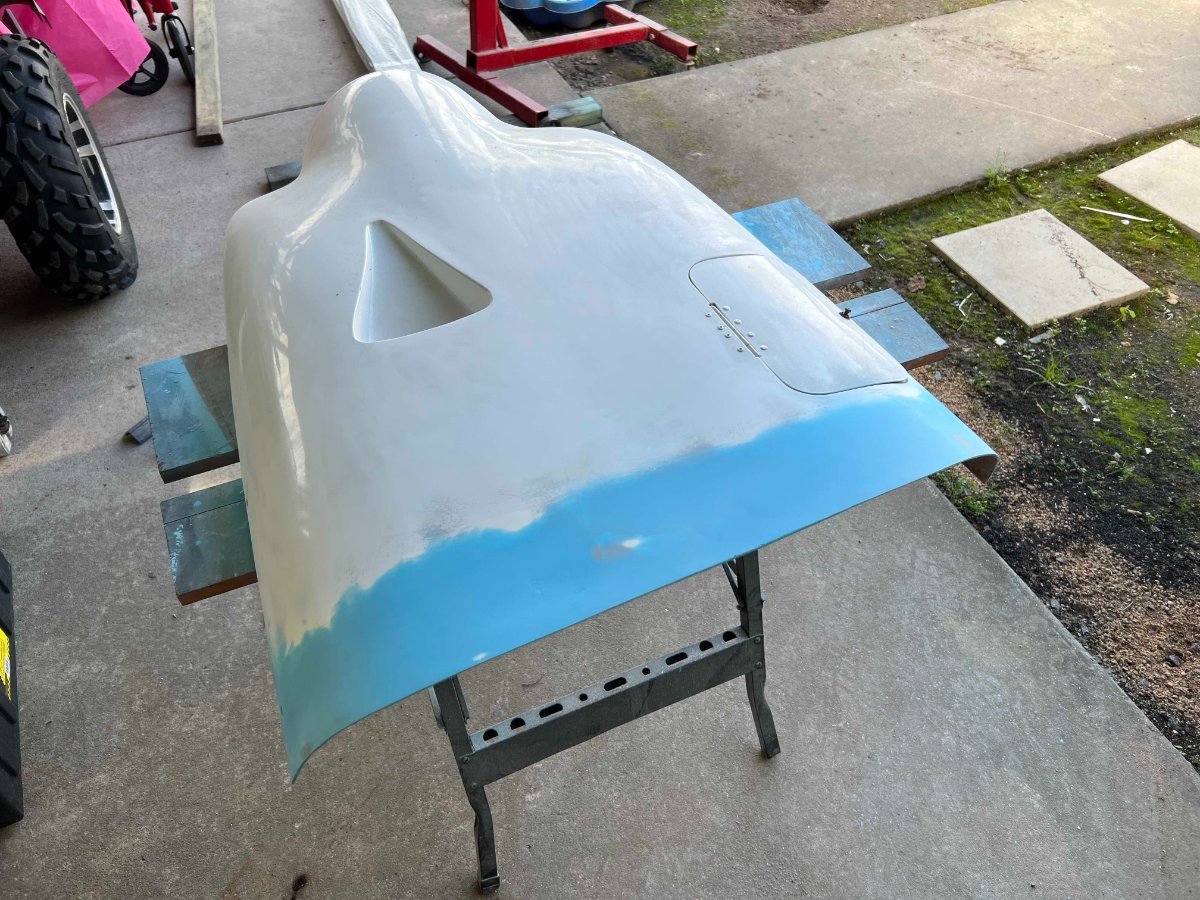
My cowl is finally finished..just have to wet rub it when I am ready for paint. The next big thing was to get the water plumbing done from the waterpump to the radiator and the return to the resovoir. Because the exhaust pipes are so close to the radiator hoses in the Sav its a real PIA. So the idea of metal pipes between over the hot areas is the go...Like the pipes Mike (Blueadventures) got for his Ninja. But we have come up with what we think is easier and cheaper. ICP have been supplying this corrogated SS pipe for fuel and oil but it seems awfully thin to me and I dont like it but locally you can get a much better albeit a bit thicker and slightly heavier much better corrogated SS pipe. So after mucking up some sizing I got the right size pipe which is their 20mm which has a OD of 26.7mm and the inner of the rubber/silicone pipe used is 25mm so its a nice tight fit. I used a thin film of lithium grease to lube the inside of the rubber and silicone pipe to allow getting the SS tube into it. The beauty of this tube is you can bend it to shapes or curves you need and it is just held onto the rubber/silicone with good hose clamps. The SS tube is super strong so you literally cant crush it and over several ridges it will creeate a great seal with no leaks. So will get that done this weekend and bribe Danny to come over and see if we can finalise the cutting and welding of the exhaust system in the 2 places I need a little more room. I also have the same stuff but the diameter for the oil..so thinking of doing the same with the oil lines A few pics attached to see what its like. The 20mm SS pipe is about $20.00 a meter
-
My Savannah S model rebuild Blog
Kyle Communications replied to Kyle Communications's topic in Savannah
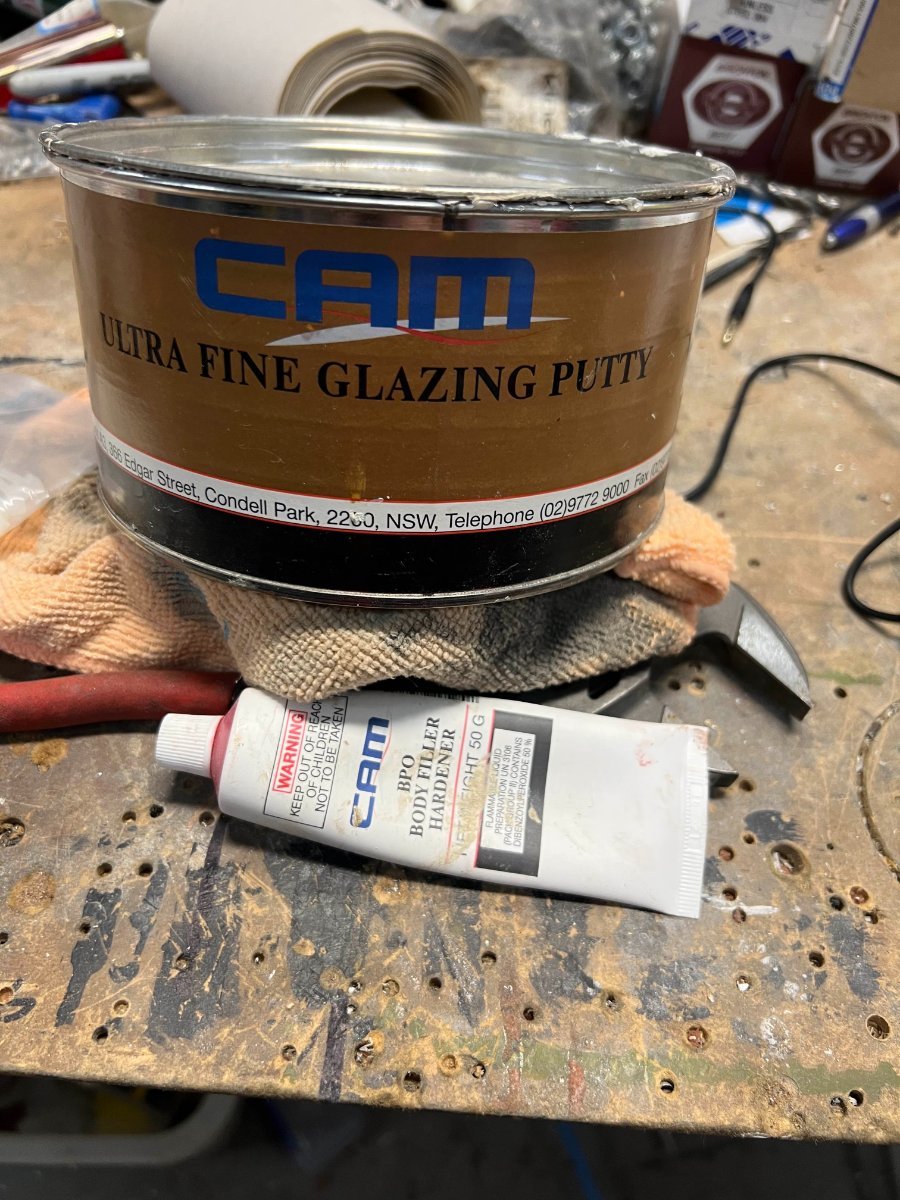
I used this ultra fine filler. Its a auto one. Almost like a super smooth cream when mixed Lovely to sand as well
-
My Savannah S model rebuild Blog
Kyle Communications replied to Kyle Communications's topic in Savannah
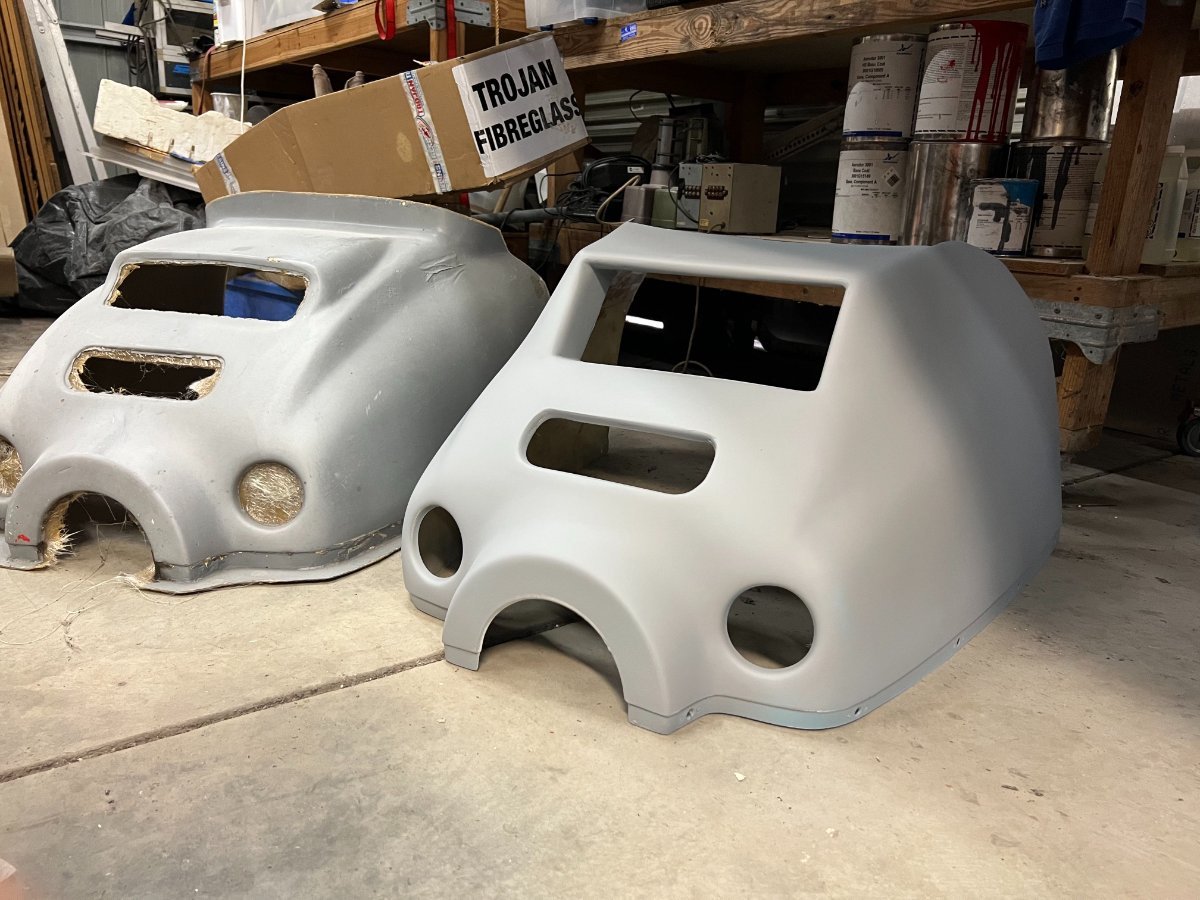
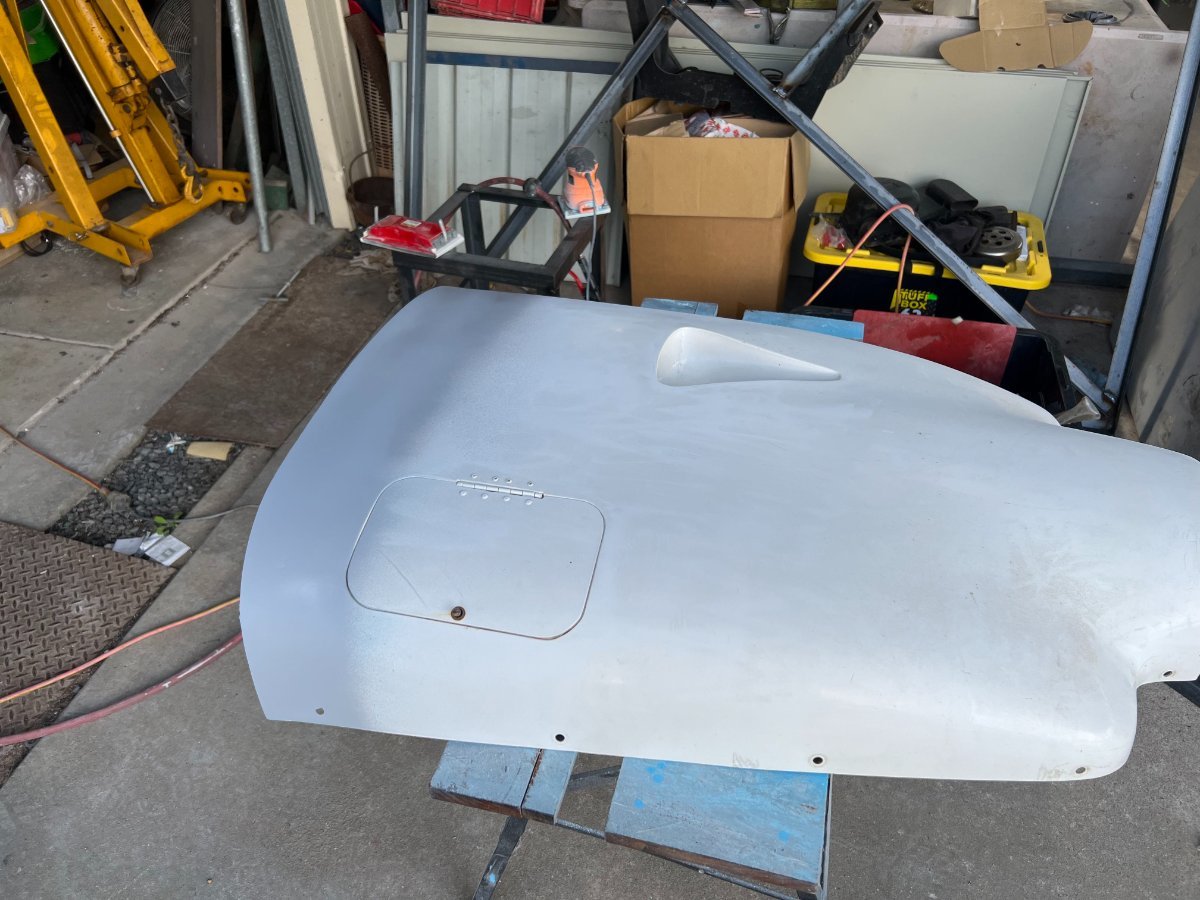
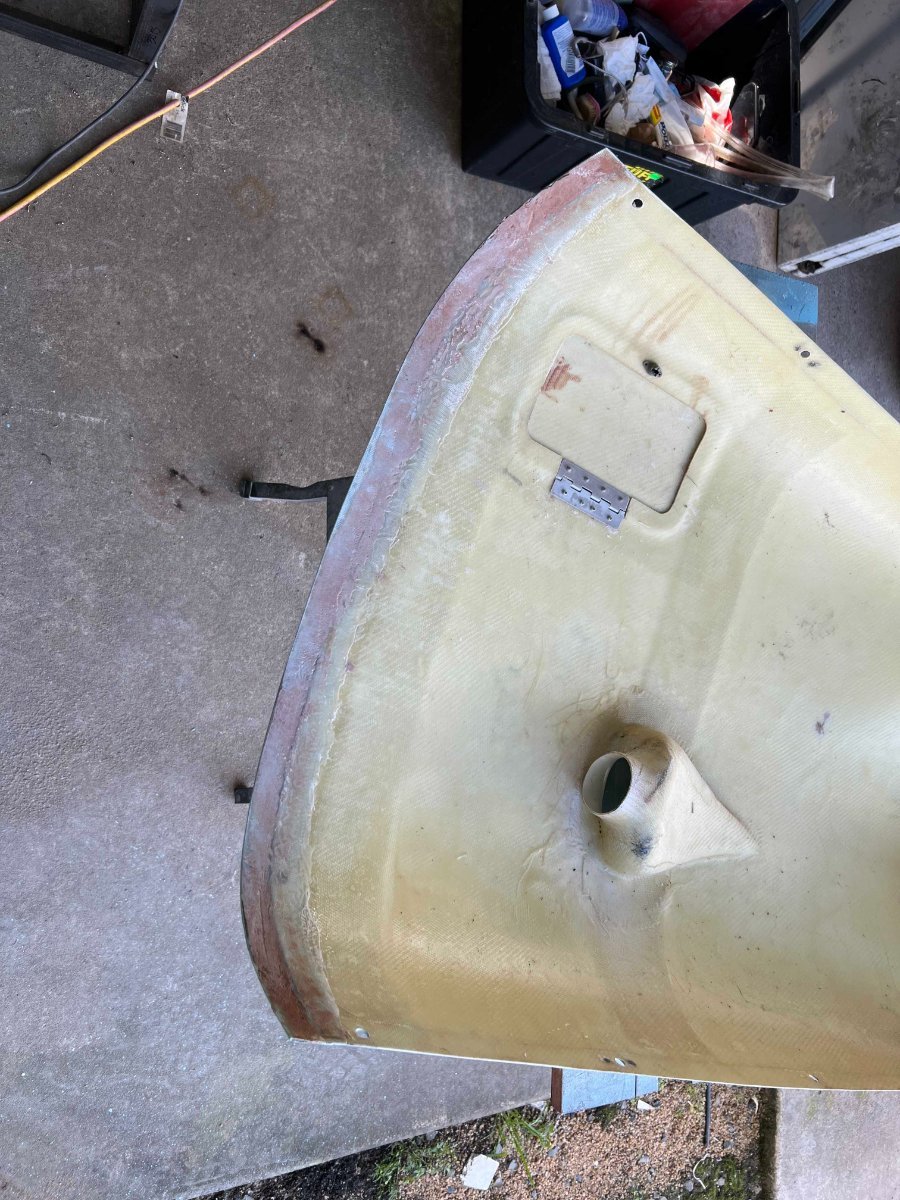
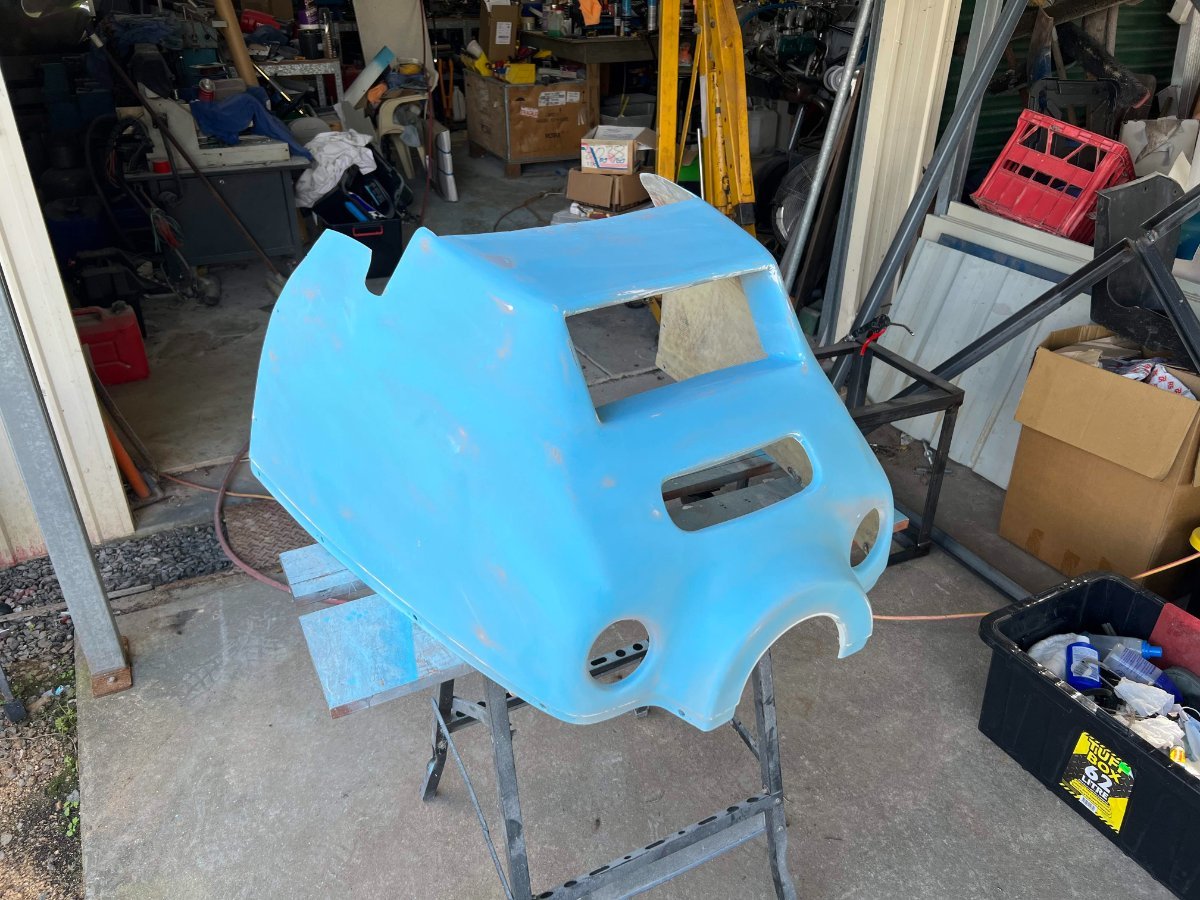
I can now finally see the light at the end of the tunnel. This cowl has been the bain of my existance. Just a couple of small indents to fill and it can be prepared for painting. Finally got my tig back today. Its been used by my mate for about 6 years...like pulling teeth 🙂 The cowl has been fitted so now I can get the headers for the engine to the muffler properly repositioned. Then its a matter of finish hooking up the radiator system. I need to finish the avionics to a point where I can start the engine at least. There is a comparison pic between the 2 lower cowls. The genuine one is a plug I made 4 or so years ago so I have that one as a plug its way to heavy to be used on a aircraft. The top cowl has been extended by 25mm so it sits over the top of the skin on the dash front properly.
-
Parachute installation
Kyle Communications replied to Geoff_H's topic in Aircraft General Discussion
Randy is supposed to be doing a option for it. Well thats what they told me. Really its just where to mount the chute for easy extraction for the rocket. The staps for the chute will go to the 4 points of the cabin cage at the wings...usually all chutes are the same so that part is easy. Its where for balance because the chute for 750kg aircraft like mine will be registered as is 21kg so thats 50 lbs or so.