Kyle Communications
-
Posts
6,669 -
Joined
-
Last visited
-
Days Won
100
Content Type
Profiles
Forums
Gallery
Downloads
Blogs
Events
Store
Aircraft
Resources
Tutorials
Articles
Classifieds
Movies
Books
Community Map
Quizzes
Videos Directory
Everything posted by Kyle Communications
-

Finally Group G is getting closer
Kyle Communications replied to Kyle Communications's topic in AUS/NZ General Discussion
Sorry the only person I trust with maintenance and inspection of the aircraft I have my bum in is ME. Nev is right..to them its just a job they usually dont do the nth degree stuff. One reason I build my own is the fact that I can maintain it and I do not fly if there is even one small issue until that issue is fixed. The rebuild of my Savannah S I bought is case in point. it was built by 2 LAME/L2 guys...look at the rebuild of savannah S blog if you want to see the quality of their work !!!! no thanks if thats the quality then thats just not good enough..and they built 13 of them I understand. Even RAAUS gave my rebuild a new kit designation when they saw the pictures I sent..basically because I had to make all new parts like skins and almost everything in Mabel is brand new that I made myself. I bought some frames from the factory and ribs for the wings and firewall but the rest was made by me or totally refurbished. I am not saying all LAME are bad of course most are very good but the care and attention to detail is not the same. When you build it yourself and you are flying it yourself the trust factor is extremely higher Mark -
Finally Group G is getting closer
Kyle Communications replied to Kyle Communications's topic in AUS/NZ General Discussion
I was always told previously the RAA aircraft had to be a factory built with a recognised engine and all instruments were to be as per what was fitted in a GA aircraft. Most GA aircraft have TSO'd instruments as far as I am aware..no cheapie chinese ones My source a week or two ago when we were speaking about this told me if the aircraft had all the correct instruments and transponders and all was in calibration with all the sign offs and you had the correct medical any RAA aircraft including a amateur built could fly in CTA. This is not what I was aware of previously. I thought there was some special deal done a couple of airports like Coffs Harbour and maybe Port macquarie and not too many others had some sort of special dispensation. Obviously I was wrong or had the incorrect information that I thought I knew. So if you have the "correct instruments" now I am not sure if you go and buy a chinese ASI and get it calibrated and put it in your Cessna 310 that that would be considered the correct instruments. If the instruments are proper ones like UMA or similar they are usually TSO'd...you can tell usually due to the price. This is why I said if the instruments are TSO'd then all should be fine. Below is what I just got from the document that Rodger posted these are really the main points. Asi I said earlier I was not aware you could fly a amateur built in CTA but if your aircraft and you complied you always could fly in CTA. For us that can not get the required medical other than currently the RAA drivers licence one then you cant do it anyway 2. The aircraft - must be compliant to the airspace requirements with current RAAus registration, CAO 100.5 pressure instrument calibration completed in the past two years, only nominated specific engines may be fitted, and transponder fitted (if required for the airspace type). 3. The airspace – to operate in the airspace the pilot must hold a current CASA Recreational Pilot Licence (RPL) or higher – which includes an in-date flight review, correct medical and has successfully completed training for the relevant airspace endorsements for CTA/CTR The pilot The pilot must be compliant to operate both the RAAus aircraft as pilot in command and to operate in the airspace as a current CASA qualified pilot. Therefore, pilots must hold both a current RAAus Pilot Certificate and a current CASA licence (i.e. have satisfactorily completed an Aircraft Flight Review (AFR) in the previous 2 years for an RPL* or higher (cannot hold a student pilot licence), and have completed the appropriate airspace training in order to meet the pilot criteria for flight through controlled airspace (CTA) in an RAAus aircraft. The medical requirements for access to CTA must also be held, which include a CASA Class 2 (Basic) Medical Certificate or higher. *Holders of a Recreational Pilot Licence must also hold the controlled airspace, controlled aerodrome and flight radio endorsements. Section 12.4 1 AIRCRAFT OPERATING IN CONTROLLED AIRSPACE (CTA) – CLASS C, D, E, 1.1 Aircraft that are currently legally permitted to fly in Controlled Airspace (CTA) as detailed in provisions of CAO 95.10, 95.32 or 95.55, must have their instruments maintained in accordance with the provisions of CAO 100.5. The checks are only available through a LAME with specialised calibrated equipment and appropriate licence ratings. This means the aircraft must have a calibrated altimeter, airspeed indicator and fuel gauges (under Civil Aviation Order (CAO) 100.5 by a Licenced Aircraft Maintenance Engineer (LAME) using specialised equipment to complete such a task; and If the controlled airspace in which the pilot intends to operate requires a transponder, the aircraft must be fitted with a suitable and calibrated transponder. Calibration must be carried out by a qualified avionics LAME. -
Finally Group G is getting closer
Kyle Communications replied to Kyle Communications's topic in AUS/NZ General Discussion
I asked about just transitioning and was told there will not be any half measures it full CTA They are not tied together at all CTA was worked on long before group G was started on. Group G is just a addon to the CYA endorsement....it will be a CTA endorsement and the pilot will be required to do what is required to pass the test. The only real difference will be the new medical standard if and when it comes in...I am told maybe late this year -
Finally Group G is getting closer
Kyle Communications replied to Kyle Communications's topic in AUS/NZ General Discussion
CTA has always been a totally separate to the Group G...They are NOT tied together and never have been' CTA access will be for 600kg and Group G but the hoops to jump through will be the same -
Finally Group G is getting closer
Kyle Communications replied to Kyle Communications's topic in AUS/NZ General Discussion
The Group G licence requirements are basically a RPL. which is GA. so to fly Group G you WILL need to upgrade your RPC or currently hold a GA licence...simple -
Finally Group G is getting closer
Kyle Communications replied to Kyle Communications's topic in AUS/NZ General Discussion
I am told by my source that CTA is well underway for RAAUS and the source is NOT RAAUS. I said really most of us just want to be able to traverse CTA...I know I dont want to fly into Brisbane or Archerfield what so ever but was told CTA is CTA you will need the proper endorsements The kicker of course is the technical details. Your instruments need to be TSO'd no different to GA with the same regular checks/calibration and of course transponder/ADSB and all that which goes with that like a approved baro source for the equipment. The aircraft whether factory built or amateur built or normal 600kg MTOW or the new 760kg Group G. The medical also "may" play a part in this but I think that is being worked on Mark -
Finally Group G is getting closer
Kyle Communications replied to Kyle Communications's topic in AUS/NZ General Discussion
I was told it is basically the same rules and proceedures as VH Experimental You will need a MPCC if you are the builder and maintainer. I ahve done the course with SAAA a few years ago in prep for this -
Finally Group G is getting closer
Kyle Communications replied to Kyle Communications's topic in AUS/NZ General Discussion
Just out from RAAUS I can now share with you that RAAus has received a new Part 149 Certificate that allows us to administer Light Weight Aeroplanes, which are known as Group G and can have a maximum take-off weight up to 760 kgs! This approval from CASA is one of the biggest advancements in member privileges we’ve seen, and we are immensely proud to provide it to our members.I’d like to thank our staff that worked tirelessly to make this a reality. Since the regulations changed to enable us to apply for this privilege back in December 2021, we’ve needed to navigate an extremely complex set of regulations, adapt our processes, have regulations amended, perform a significant amount of safety analysis and conduct risk assessments, and engage professionally with our regulator. Right here, is one of the largest benefits for our members. That is, RAAus does all of this work so you don’t have to! Our next steps are to implement Group G methodically and compliantly. There is a sequence to enabling Group G become operational and the first major implementation activity is to educate our Chief Flying Instructors in mid-February when we’ll be hosting a conference in Brisbane, where much of the operational and technical information will be shared. We then need aircraft registered in this new Group, we need instructors trained, we need to publish the new Ops and Tech manuals, and there are internal processes that need finalising, etc etc. Regardless, we’re hopeful that come 25 March we’ll be able to start registering some aircraft and be able to ramp up from there. We know there is a fair bit of demand amongst the membership, with more than 400 members responding to the recent survey indicating their intent to either obtain a Group G Pilot Certificate and/or register an aircraft in this new group. This is a great thing for members, RAAus and the broader industry! -
ADS-B Grant
Kyle Communications replied to skippydiesel's topic in Instruments, Radios and Electronics
Mine is not installed yet. Only wings done on the S-21 so far. I will integrate it with my MGL EFIS as well. -
ADS-B Grant
Kyle Communications replied to skippydiesel's topic in Instruments, Radios and Electronics
Wow time goes fast..I bought mine in Nov 2022 I know a new firmware has come out for the AV30 which I have to do yet -
ADS-B Grant
Kyle Communications replied to skippydiesel's topic in Instruments, Radios and Electronics
When I bought mine it was $8070 total price...I think they had a special on at the time. The GUBBERMENT gave me back $4035 in about 4 weeks. I was originally going to just get the TailbeaconX but the guy here told me I would then need my own barometric source for it. The source was in the AV30 plus it is a really great EFIS and it was all TSO'd so bit the bullet and bought the lot. I am installing it myself of course as I am the builder and also a radio tech for 30 years so I filled out that paperwork for installer as myself and all went through without any questions -
ADS-B Grant
Kyle Communications replied to skippydiesel's topic in Instruments, Radios and Electronics
I got my TailbeaconX and AV30 package as well some time ago...its a nice bit of kit and yes you do get the rebate as the baro source required is in the AV30 Also there used to be a package for experimental...but the only version now for us at least to get is the full TSO'd version -
Wanted: Uavionix SkyEcho ADSB transceiver
Kyle Communications commented on pild04's classified in Aviation Other
There are 2 systems in use in the USA..as usual because they are a world unto themselves and they think they are the centre of the universe most are on UAT about 978mhz for their stuff but proper ADSB on 1090 mhz is in use. I think of course ATC have to look at both over there. The Canadian issue of course is their RF management government body. If it is not type approved for that freq use by that particular device then just be aware that you are contravening the law there. Not saying that is a bad thing for safety but you know what govt numpties are like and they may make a example of you. Mark -
New throttle system for Rotax
Kyle Communications replied to Kyle Communications's topic in Savannah
It is extremely long. I am working towards getting some ready this coming week. Just been way too busy with too many other jobs here...:( -
Finally Group G is getting closer
Kyle Communications replied to Kyle Communications's topic in AUS/NZ General Discussion
Same here. Got my number for the RANS S-21 about a year ago I think but no prefix yet -
From the CEO G’day all I’m pleased to say that we are getting awfully close to obtaining our 760 kg MTOW (Group G) approval. Pleasingly, CASA recently gave in-principle approval of the RAAus Flight Operations and Technical Manual revisions that are necessary to align our manuals to CASA regulations for this new Group of aircraft. With this, I’m confident that our final approval shouldn’t be too far away. With the increased certainty around what will be approved by CASA, our staff are now busy, readying internal business systems, creating new forms, developing education and training programs and implementing a detailed member communication plan, to make this transition as easy as possible for members. We have built the following library of questions to answer what we believe will be common questions on various topics using information on what we know at this time. Once we receive the final approval from CASA, the answers to these FAQs will be updated as necessary. Members are encouraged to keep reviewing this page and reading e-news for the latest information. And if you think of any other questions that we haven’t yet answered, please send them through to [email protected] so we can pop these up on the website for everyone to see. Cheers Matt Bouttell CEO Complete the Group G Implementation Survey for regular updates and priority access As part of our preparation for the implementation of the MTOW increase, RAAus has prepared a survey to obtain expressions of interest in relation to the registration and operation of Group G aircraft in order to understand the numbers of applications expected for workload planning purposes. By taking part in our survey you will be able to subscribe to our Group G information list to receive more regular updates, as well as priority access to applications when RAAus goes live. https://www.surveymonkey.com/survey-taken?sm=DfZDNuordAiMMwNoapy3I6EzxlMtq3qPw2ovPrG9K7Y_2B13kaxxPFjYGSndw8mg3oRQ11Hfy0dorVhjkbTkfx6Ntj7Ir6T8wkt90JUHZMp6Q_3D
-
Ultralight crash north of Grafton 12/12/23
Kyle Communications replied to Cosmick's topic in Aircraft Incidents and Accidents
I think you can buy a kit for them Years ago I was looking at a SuperStol but ended up going with the RANS S-21 Outbound -
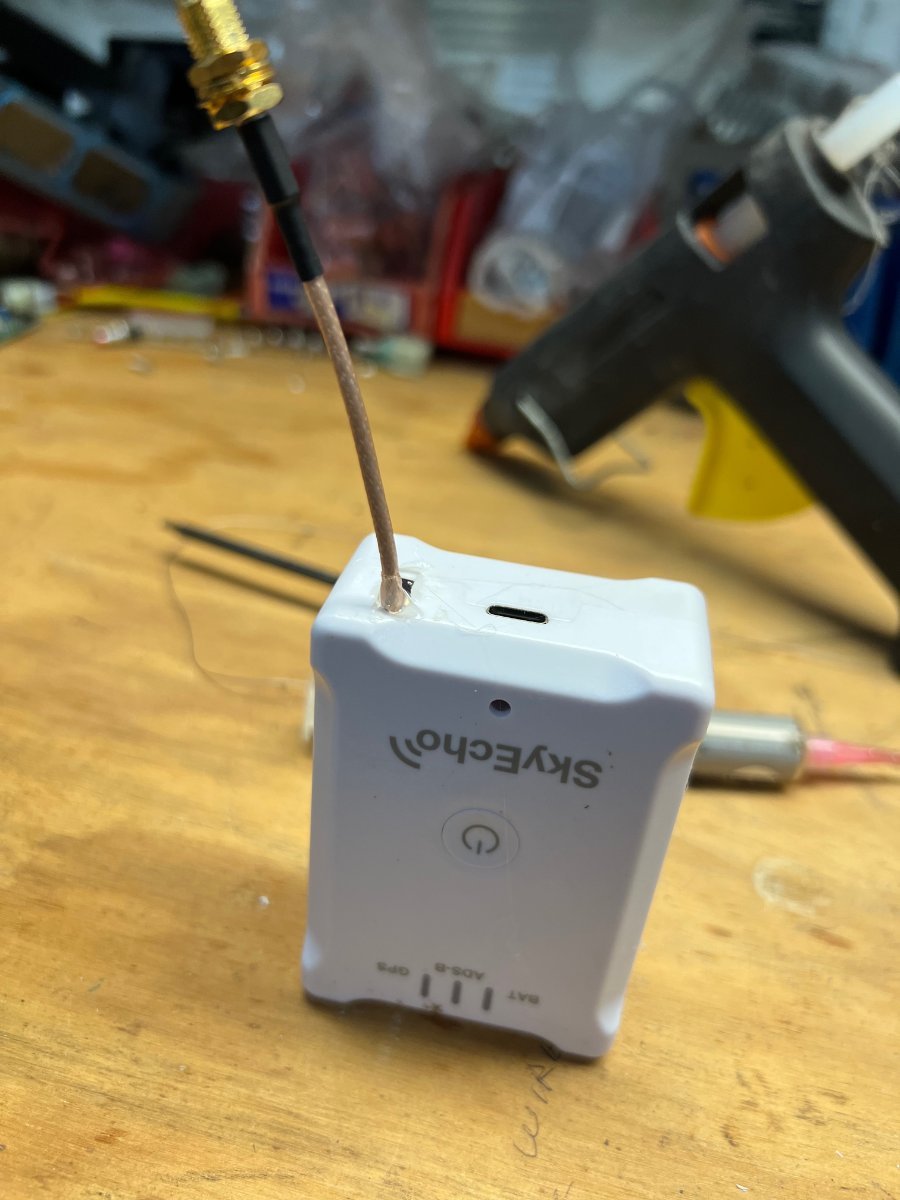
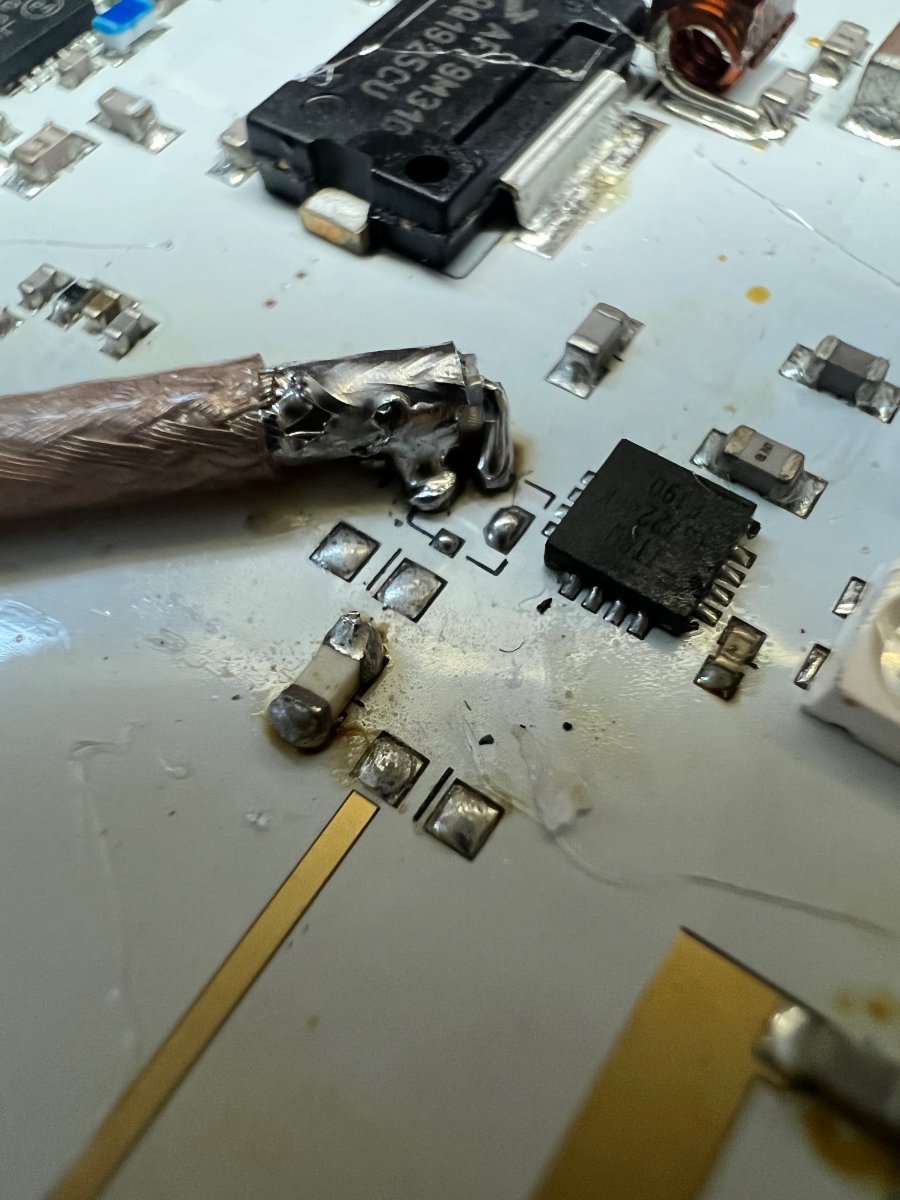
I have installed a external antenna to mine and it increases its rx and tx range at least by twice using a external antenna. You have to make a pigtail as there is not enough room inside to install a antennea socket on the case. You need to remove the miniture coax connector on the pcb and carefully attach the good quality coax to the correct pads and of course anchor the coax inside with neutral cure silicone or similar. Of course you do this at your own risk and also your local countries rules. But it allows you to go to a proper ADSB antenna. It works but you still need the SE2 on the dash for the GPS signal

-
Love those seats Marty
-
Anything tailwheel will attract almost double the cost of insurance. This is the major reason I ordered the nosedragger kit for my S-21. I ordered the kit as a TD but it will now be built as a ND I had to make a claim when the noseleg snapped off on The Girlfriend and I have to say I was super impressed with how it was all handled and no whinging from the insurer except pushing me to get it done. I was waiting on parts from Italy so it took a while but other than that I was very pleased with them and geoff made sure everything went seamlessly
-
My first Sav was insured by Geoff Tonkin in 2012. I kept it with him all the time the 10 years I owned it. Always the best price and it got better if you had a Rotax powering it. My next 2 which is Mabel and the Mistress. (S-21) will most likely be done through Geoff. He is without a doubt the best guy on the job I cant give you who to not go to as I did some price checking with others and always came back to Geoff Mark
-
From the pilot himself on FB only partial of hs post His wife has a few broken ribs and some vertibrae damage but will recover ok " So, we had been out for a pleasant morning flight up the coast. We were coming in to land a got a gust of crosswind that blew the aircraft to the right, I’d initiated a go around but clipped a tree which caused us to speared into the ground. Thankfully the Glastar has a very good safety cage and we were wearing 4 point harnesses."
-
The Gastar was made originally with the suburu but he bought a Lycoming and was going to refit it I believe. I know he had just upgraded the wheels and brakes
-
🚨🚨Active Incident 🚨🚨 Paramedics have assessed 2 patients after the... WWW.FACEBOOK.COM 🚨🚨Active Incident 🚨🚨 Paramedics have assessed 2 patients after the light aircraft they were in came down in a residential backyard at Cootharaba.... I know whose aircraft this is..looks like he is ok and the wife flown to hospital but not critical injuries thank god
-
E-Props ...who has first hand experience with these
Kyle Communications replied to eightyknots's topic in Engines and Props